Battery switch on travel trailer function is crucial for managing your RV’s power. Understanding how your battery switch works—whether it’s a simple single-battery switch or a more complex dual or rotary system—is key to safe and efficient power usage. This guide breaks down the different types, shows you how to connect and disconnect batteries safely, and helps you troubleshoot problems.
We’ll cover everything from basic maintenance to upgrading your system for optimal performance.
We’ll explore the inner workings of various battery switch types, detailing their advantages and disadvantages. Learn the correct procedures for connecting and disconnecting your batteries to avoid electrical hazards, and discover how to diagnose and fix common issues using simple tools. We’ll also look at how your battery switch interacts with other systems in your RV, like solar panels and inverters, to ensure you get the most out of your power setup.
Battery Switch Types in Travel Trailers: Battery Switch On Travel Trailer Function
Choosing the right battery switch for your travel trailer is crucial for managing your power sources effectively and preventing electrical issues. Understanding the different types available will help you make an informed decision based on your needs and budget. This section will explore the common types, their functionality, and their pros and cons.
Single Battery Switches
Single battery switches are the simplest type, designed for use with a single battery. They essentially act as an on/off switch, connecting or disconnecting the battery from the trailer’s electrical system. The internal mechanism is usually a simple toggle or rocker switch that makes or breaks the electrical connection. These switches are inexpensive and easy to install, making them a popular choice for trailers with smaller power demands.
However, they lack the flexibility of more advanced switches.
So, you’re an audiophile who loves to travel? Awesome! Check out this guide on audiophile travel setups to make sure your listening experience stays top-notch on the road. Then, once you’re settled in your travel trailer, understanding the battery switch on travel trailer function is key to keeping your tunes playing and your lights on.
Knowing how your power works is just as important as your amazing headphones!
Dual Battery Switches
Dual battery switches, as the name suggests, allow you to manage two batteries independently. These switches often incorporate a “both,” “battery 1,” “battery 2,” and “off” position. Internally, they typically use a rotary selector switch with multiple contact points. This allows you to select which battery (or both) powers the trailer’s systems. This is beneficial for extending your camping trips as you can use one battery for house functions and the other to start the tow vehicle.
Maintenance is straightforward; just ensure the switch moves freely.
Rotary Battery Switches
Rotary battery switches offer more sophisticated control over multiple batteries, usually two or more. The internal mechanism involves a rotating dial that connects and disconnects various battery combinations. These switches can be more complex than dual switches, often featuring positions for combining batteries, isolating them, or completely disconnecting the system. This is ideal for managing deep-cycle and starting batteries simultaneously.
They are generally more expensive than simpler switches but offer greater flexibility and control.
Comparison of Battery Switch Types
| Feature | Single Switch | Dual Switch | Rotary Switch |
|---|---|---|---|
| Number of Batteries | One | Two | Two or more |
| Functionality | On/Off | Battery 1, Battery 2, Both, Off | Various combinations, including parallel and isolated connections |
| Cost | Low | Medium | High |
| Maintenance | Minimal | Minimal | Moderate (ensure smooth rotation) |
Connecting and Disconnecting Batteries
Connecting and disconnecting your travel trailer’s batteries safely is crucial for preventing damage to your electrical system and avoiding personal injury. This process involves understanding your battery switch type and following a careful procedure. Improper handling can lead to sparks, short circuits, and even battery explosions.Connecting and disconnecting batteries using a battery switch is straightforward but requires attention to detail.
The specific steps vary slightly depending on whether you have a single-pole, double-pole, or more complex switch. Always remember to consult your specific battery switch’s instructions for the most accurate and safe procedure.
Single-Pole Battery Switch Connection and Disconnection
A single-pole switch controls the power to one battery bank. To connect, firmly rotate the switch to the “ON” position. You should hear a definitive click. To disconnect, rotate the switch to the “OFF” position. Visually confirm the switch is in the correct position.
This simple action cuts power to the battery bank connected to the switch. Improper use could lead to unexpected power remaining in the system or accidental disconnection of essential components.
Double-Pole Battery Switch Connection and Disconnection
Double-pole switches control two separate battery banks. This allows you to isolate either bank or both simultaneously. Connecting involves rotating the switch to the “ON” position for the desired bank or banks. Disconnecting involves rotating the switch to the “OFF” position for the relevant bank or banks. Ensure you understand which position controls which bank(s) to avoid inadvertently disconnecting essential systems.
Failure to correctly operate a double-pole switch can result in partial power loss or unintended electrical shorts.
Potential Risks of Incorrect Battery Connection and Disconnection Procedures
Incorrectly connecting or disconnecting batteries can result in several dangerous situations. Sparks can ignite flammable gases near the batteries, causing explosions or fires. Accidental short circuits can damage electrical components in your trailer or even lead to injuries from electric shock. Moreover, improper handling can damage the battery terminals or the switch itself, requiring costly repairs. For instance, forcefully connecting terminals can bend or break them, reducing their conductivity and lifespan.
Safety Precautions During Battery Connection and Disconnection
Always wear safety glasses to protect your eyes from potential sparks or acid splashes. Ensure the area is well-ventilated to prevent the buildup of flammable hydrogen gas released by the batteries. Never wear loose clothing or jewelry that could accidentally come into contact with the battery terminals. Use insulated tools to avoid electric shock, and always disconnect the negative (-) terminal first when disconnecting and connect it last when connecting.
This minimizes the risk of accidental short circuits. Before working with your batteries, it is always a good idea to check your RV’s owner’s manual for specific battery safety instructions and maintenance schedules.
Troubleshooting Battery Switch Issues
Dealing with a malfunctioning battery switch in your travel trailer can be frustrating, but systematic troubleshooting can often pinpoint the problem quickly. Understanding the common issues and how to test for them will save you time and potential headaches on the road. This section details common problems and provides step-by-step guidance to resolve them.
Common Battery Switch Problems and Troubleshooting Steps
Several issues can arise with your travel trailer’s battery switch. These include a complete lack of power, intermittent power supply, and overheating of the switch itself. Let’s explore each and how to address them.
- No Power: This indicates a complete break in the circuit. First, visually inspect the switch for any obvious damage, such as loose wires, broken connections, or a visibly damaged switch. Check all fuses in the system, both at the battery and in the trailer’s distribution panel. If the fuses are fine, use a multimeter to check for voltage at the battery terminals and at the switch’s input and output terminals.
A lack of voltage at any point indicates a break in the circuit that needs further investigation. Trace the wiring from the battery to the switch and from the switch to the trailer’s electrical system, looking for loose or corroded connections.
- Intermittent Power: This suggests a loose connection or a problem with the switch itself. Begin by inspecting the switch and wiring for any loose connections, corrosion, or signs of wear and tear. Pay close attention to the terminals and ensure they are clean and tightly secured. A multimeter can help pinpoint intermittent issues by checking voltage at various points in the circuit while operating the switch.
So, you’re an audiophile who loves to travel? Awesome! Check out this guide on creating the perfect audiophile travel setup to keep your ears happy on the go. It’s all about packing smart and choosing portable gear that doesn’t compromise on sound quality. Then, when you get to your destination (maybe a travel trailer?), you’ll want to understand how the battery switch on travel trailer function works to power your awesome setup! Knowing this is key for enjoying uninterrupted tunes wherever your adventures take you.
If the voltage fluctuates, the switch is likely the culprit. A corroded or damaged switch may exhibit this problem. Consider cleaning the switch contacts with a wire brush and contact cleaner if corrosion is suspected.
- Overheating: An overheated battery switch is a serious issue that points to high current draw or a short circuit. This is dangerous and should be addressed immediately. Turn off the switch immediately and disconnect the battery to prevent further damage. Inspect the switch for any signs of damage or burning. Check all wiring for short circuits, ensuring wires are properly insulated and not touching metal components.
If a short circuit is suspected, a qualified electrician should be consulted.
Diagnosing a Faulty Battery Switch with a Multimeter
A multimeter is an invaluable tool for diagnosing battery switch problems. To test the switch, first ensure the battery is disconnected. Then, set your multimeter to measure DC voltage.
- Check Battery Voltage: Measure the voltage directly across the battery terminals. This establishes a baseline. A fully charged 12V battery should read around 12.6V.
- Check Input Voltage at the Switch: With the switch OFF, measure the voltage at the switch’s input terminals. This should match the battery voltage if the wiring is sound.
- Check Output Voltage at the Switch: Turn the switch ON. Measure the voltage at the switch’s output terminals. This should also match the battery voltage if the switch is functioning correctly. If the voltage is significantly lower or zero, the switch is likely faulty.
- Check for Continuity: Set your multimeter to check continuity (usually represented by a diode symbol). With the switch OFF, measure the continuity between the input and output terminals. There should be no continuity. With the switch ON, there should be continuity. A lack of continuity in either state suggests a problem within the switch.
Troubleshooting Flowchart
The following flowchart guides you through troubleshooting a malfunctioning battery switch:
Start –> Visual Inspection (Loose Wires, Damage?) –> Yes: Repair/Replace Wiring –> No: Check Fuses –> Blown Fuse: Replace Fuse –> No Blown Fuse: Use Multimeter to Check Voltage at Battery, Switch Input, and Switch Output –> Voltage Problem: Investigate Wiring, Connections, and Switch –> No Voltage Problem: Check Switch Continuity –> Continuity Problem: Replace Switch –> No Continuity Problem: Investigate other electrical components.
Battery Switch Integration with Other Systems

Your travel trailer’s battery switch isn’t just a simple on/off switch; it’s a crucial component in managing the flow of power throughout your RV’s electrical system. Understanding how it interacts with other systems like solar panels, the converter, and the inverter is key to safe and efficient power management. This section will detail these interactions and explain the importance of proper fusing.The battery switch acts as the central control point for your house batteries, determining which systems receive power and when.
When the switch is in the “on” position, it allows power from your batteries to flow to various appliances and charging systems. Conversely, turning the switch “off” isolates the batteries, preventing accidental discharge or draining, even if other systems are still powered by shore power or solar. This isolation is critical for preventing damage to your batteries or other components during storage or transport.
Interaction with Solar Panels
Solar panels generate DC power that needs to be regulated and stored. A charge controller manages the solar panel’s output, preventing overcharging of your batteries. The battery switch then controls whether that stored power from the batteries (charged by solar) is available to the rest of the RV’s systems. Essentially, the solar panels charge the batteries, and the battery switch decides where the power stored in those batteries goes.
If the switch is off, even with abundant sunshine, your appliances won’t draw power from the solar-charged batteries.
Interaction with the Converter
The converter transforms shore power (120VAC) into DC power for charging your batteries and powering some 12V appliances. The battery switch plays a role in managing power distribution: if the switch is off, the converter still charges the batteries (unless specifically designed to prevent this), but the house batteries aren’t accessible to other 12V systems in the RV. In essence, the converter works independently to charge the batteries, but the battery switch determines if the charged batteries can supply power to other 12V loads.
Interaction with the Inverter, Battery switch on travel trailer function
The inverter converts DC power from your batteries into AC power (120VAC) to run household appliances. The battery switch directly controls the power flow to the inverter. With the switch off, the inverter is powerless, even if the batteries are fully charged. This prevents accidental draining of your batteries while the inverter is inactive. The inverter draws power from the batteries, and the switch determines if that power is available.
Proper Fusing of Circuits
Proper fusing is essential for protecting your electrical system from overloads and short circuits. Each circuit connected to the battery switch should have its own appropriately sized fuse or circuit breaker. The fuse rating should be slightly higher than the maximum current draw of the circuit it protects, but never exceed the wire’s capacity. For example, a circuit powering a 10-amp water pump should use a 15-amp fuse, but not a 20-amp one.
Incorrect fusing can lead to overheating, fire hazards, and damage to equipment.
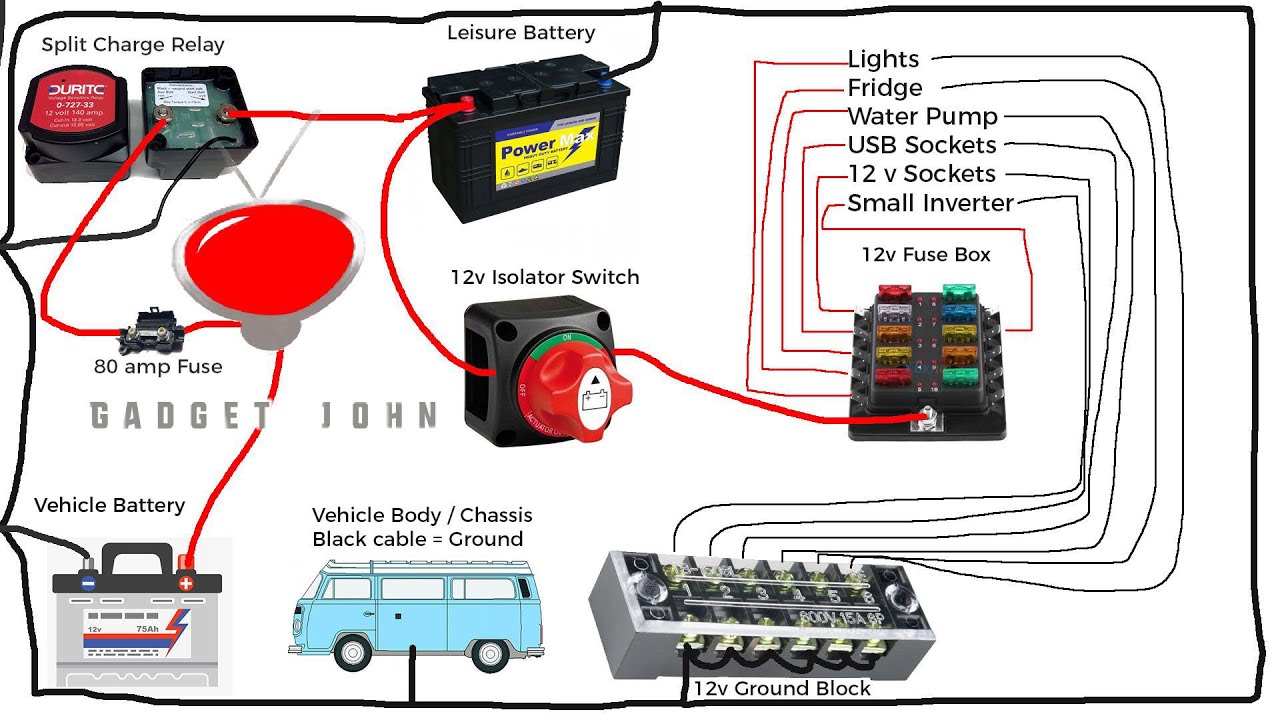
Diagram of Electrical Flow
Imagine a simple diagram: Two house batteries are connected to a battery switch. From the switch, multiple wires branch out. One wire goes to the converter, which charges the batteries and powers some 12V lights. Another wire goes to a fuse box, distributing power to other 12V appliances like the water pump and lights. A third wire goes to the inverter, converting DC to AC for higher-wattage appliances.
When the switch is on, power flows freely through these pathways. When the switch is off, the flow is interrupted, protecting the batteries. Each branch to a significant load has its own fuse for safety.
Mastering your travel trailer’s battery switch is about more than just turning power on and off; it’s about understanding your RV’s electrical system and ensuring its safe and efficient operation. By following the maintenance tips and troubleshooting steps Artikeld here, you can keep your battery switch running smoothly, preventing costly repairs and ensuring you always have power when you need it.
So, get familiar with your switch, and hit the road with confidence!
FAQ
What size fuse should I use for my battery switch?
The correct fuse size depends on the amperage rating of your battery switch and wiring. Consult your RV’s wiring diagram or a qualified electrician to determine the appropriate fuse size.
My battery switch is making a clicking noise. What’s wrong?
A clicking noise often indicates a faulty switch or a problem with the battery connections. Check for loose or corroded connections. If the problem persists, replace the switch.
How often should I clean my battery terminals?
Clean your battery terminals at least twice a year, or more often if you notice corrosion. Use a wire brush and baking soda solution to clean them thoroughly.
Can I use a battery switch from a different RV?
It’s generally not recommended. Ensure the replacement switch has the correct amperage rating and is compatible with your RV’s electrical system. Consult your RV’s manual or a qualified technician.
